
A Behind-The-Scenes Look at My Curated Instagram
/My name is Grace Nuth, and I curate my Instagram. What exactly does that mean? Well, for one thing it means I spend far too much time thinking about things like color scheme, symmetry, mood, and story. But it’s something I love doing, and I thought it might be fun to give you an inside glimpse on what it’s like to have an Instagram that’s curated and used as a form of artistic and personal expression.
I’ve had Instagram for about five years now, but it was only three years ago that I really decided to try to start making it a hobby that I consciously put effort into. I started going to the profiles of creators whose shares I really loved and admired and trying to find commonalities in them. I discovered that I mostly loved a. gorgeous flat lay photographs of magical items b. nature photos c. fairy tale and fantasy portraits in nature. So that’s what I focused on creating.
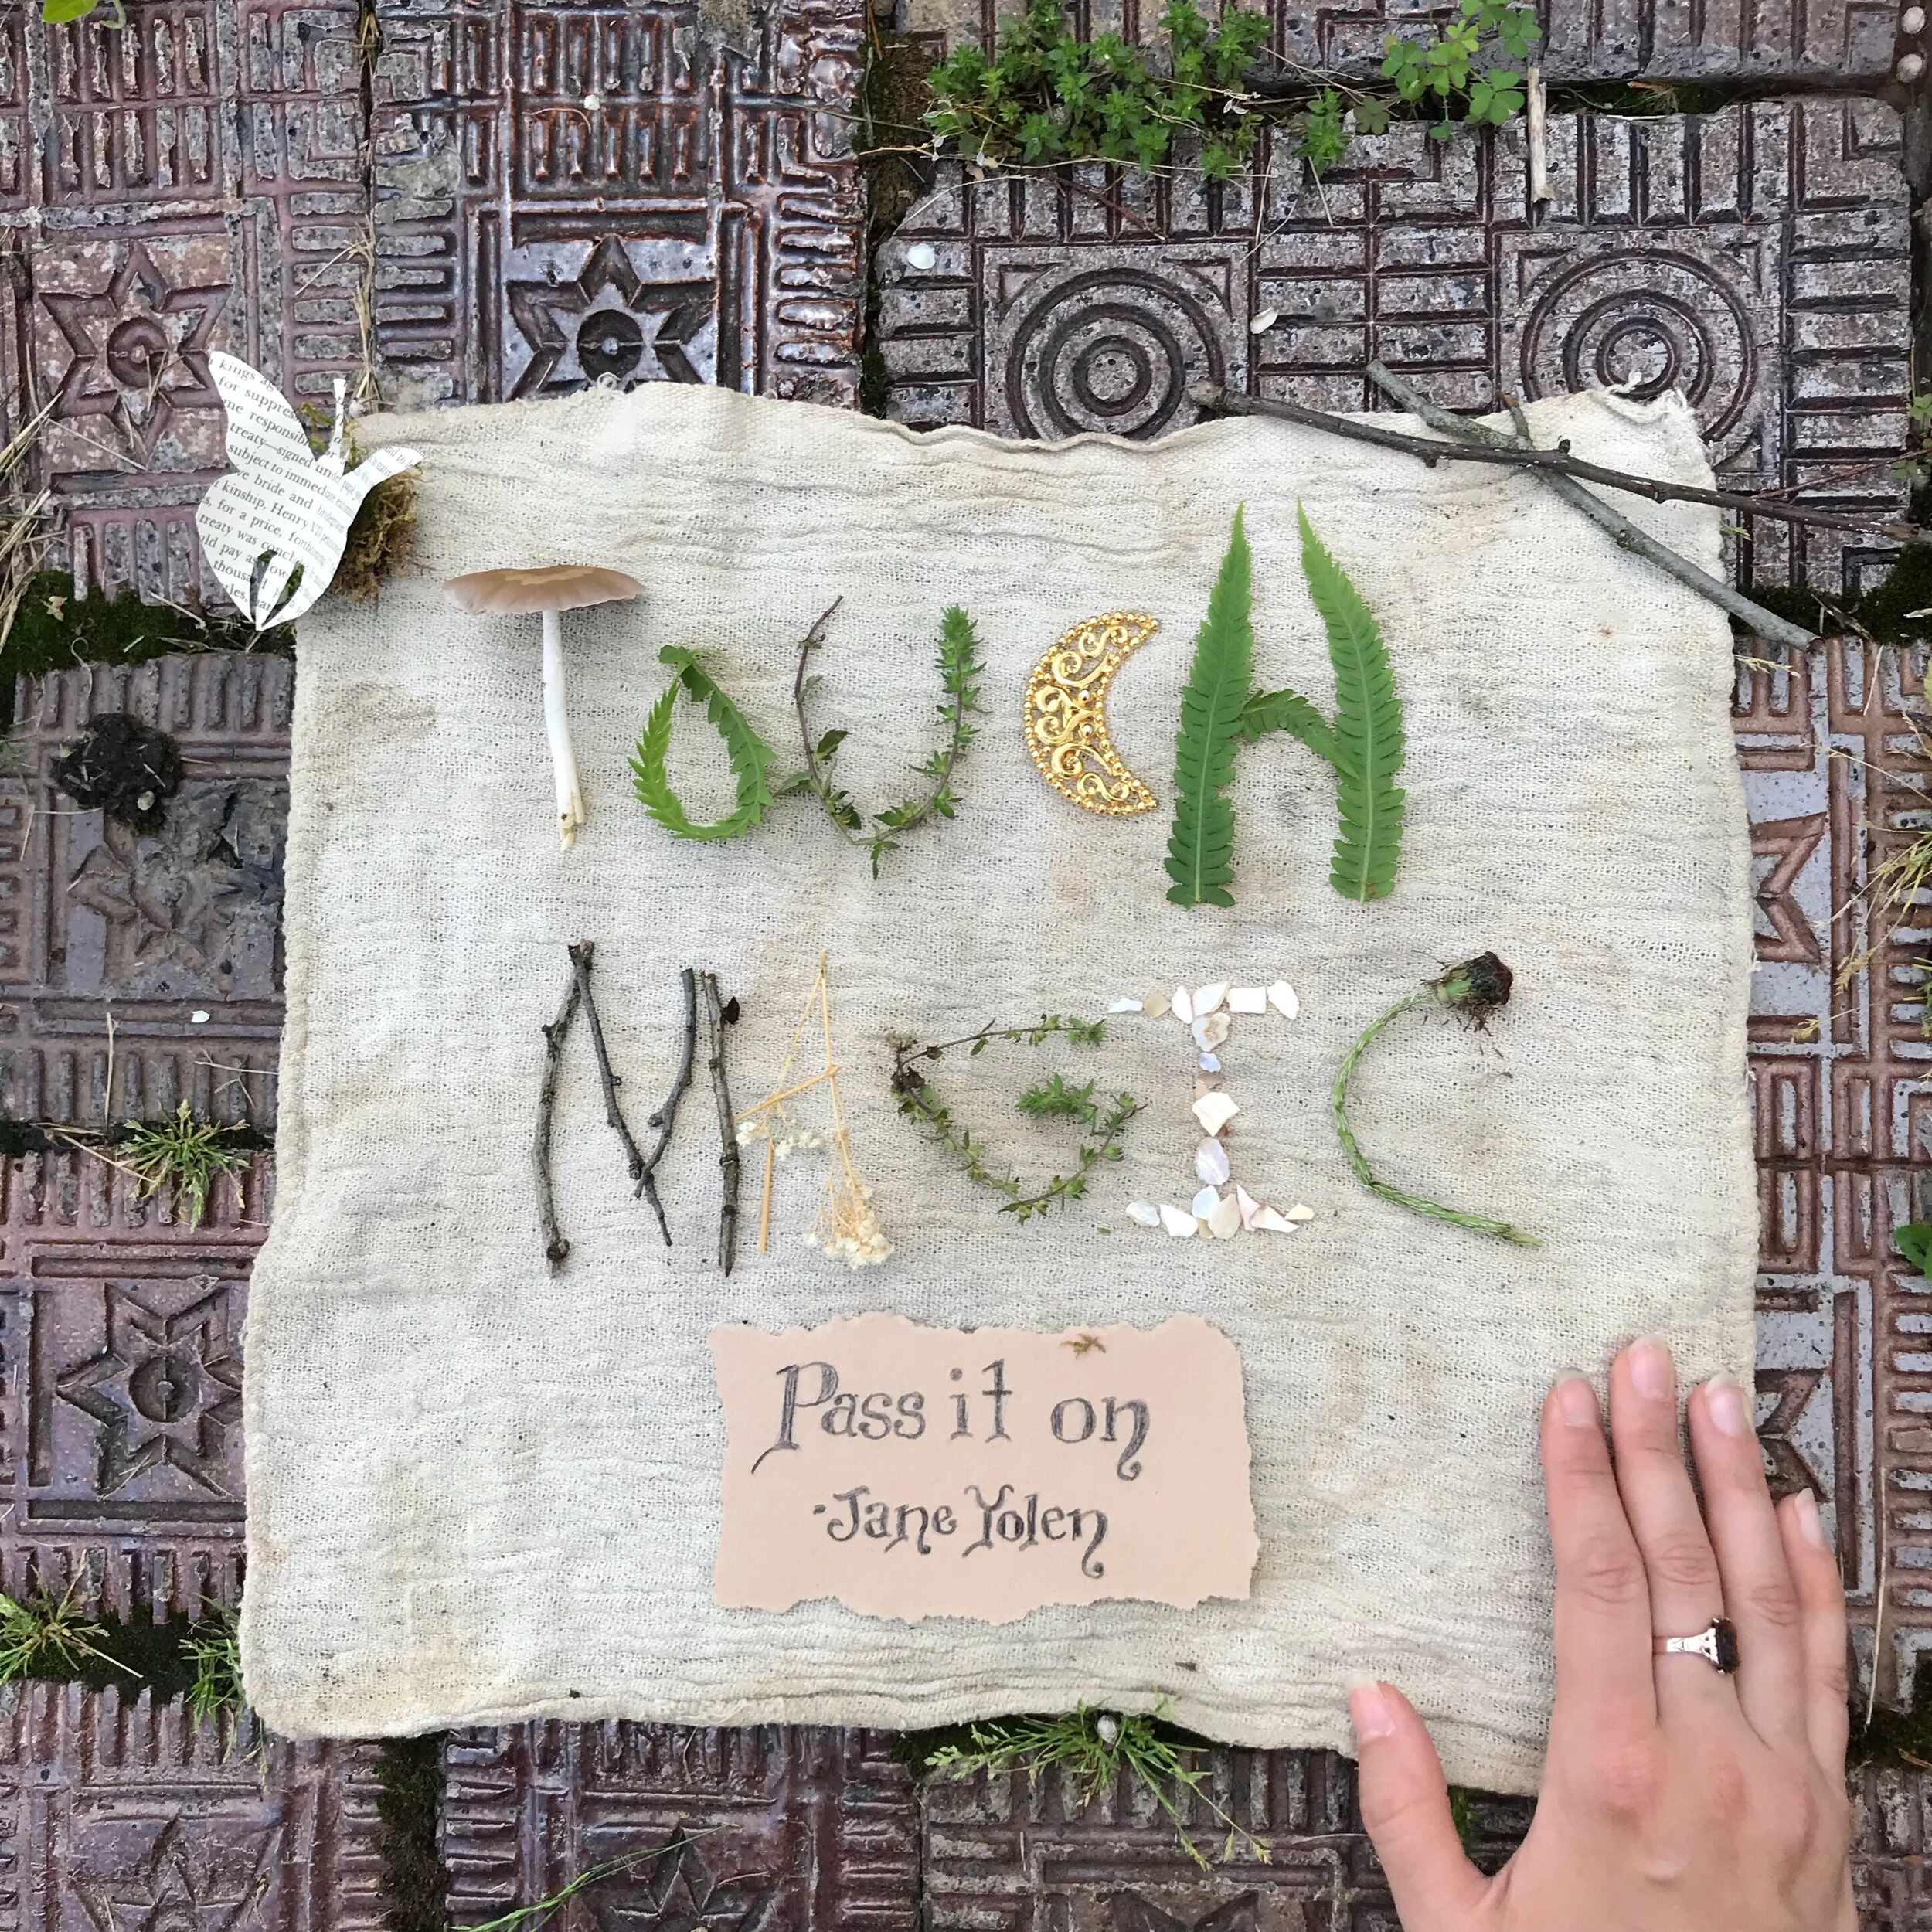
My favorite flat lay I’ve made so far.
Instagram has become a real source of joy to me. I’ve mentioned it before, but it was because of my hobby of sharing photos that I started making forest visits a regular (now weekly) habit. When I was on furlough and in quarantine, I would sometimes go to the woods three or four times a week. There’s a book about Instagram that I highly recommend; Hashtag Authentic by Sara Tasker. In it, she talks about how Instagram can be dangerous because it creates a curated reality, as I’m sure you’ve heard argued, but it can also be a beautiful tool to help you to look at your everyday world more closely and artistically, opening up a new world of wonder. I have definitely found the latter to be true.
So let’s dive right in, shall we? Let me tell you a little bit about how I plan my Instagram.
Symmetry. If you go to my Instagram page, @gracesidhe, hopefully one of the very first things you’ll notice is a pleasing symmetry to the eye. Even though most people browse Instagram from their home page of followed profiles, and very few people who follow me will make a repeated habit of clicking on my actual page to look at what new things I’ve shared, I still find that focusing on symmetry on my page engages strangers when they click to see if they want to follow me. I would honestly be willing to bet that even if it’s subconscious, it’s a reason why I’ve gained at least some of the followers I have there. Also, to be honest, it just brings me a lot of joy too, to look at my page and see it laid out symmetrically. Because of this, I post three pictures a day, all at the same time, usually at around 8:00 a.m. EST. That way I have full control over what my page looks like (since a person’s page on Insta always displays with three images across the screen) and the symmetry is never broken.

This gorgeous and large mossy rock troll is an example of an image from my phone that’s just waiting for a symmetrically pleasing companion to go on my Instagram feed.
Symmetry for me can mean symmetry of subject matter (mushroom, tree, mushroom) or mirroring of visuals (diagonal left-right tree branch, center image, diagonal right-left tree branch.) Sometimes I keep ahold of photographs from nature walks that I’m positively itching to use, but I wait until I take a good “companion image” to share with it. Of course, however, I try to never wait too long, for instance, once summer has shifted fully into fall, and fall into winter, etc, I will delete most of the images I haven’t used yet from the previous season. Which brings me to…
Color scheme. The color scheme of my Instagram feed will change with the seasons. Since I have a profile that is very nature-based and magic based, this only makes sense. The single color that threads through almost all of the images I share is green, which again makes sense for the theme of my page. But for instance, take a look at this example of my recent feed, which I have been consciously shifting from summer to autumn in color tone.
See how the photographs go from predominantly green at the bottom (oldest images), to green and yellow, to pops of red and orange with green at the top (newest images)? As the year continues, the red and yellow and orange of the autumn colors will shift to burgundies, whites, and greens for Christmas, and then whites and browns of the winterscape. I try to never shift the colors too quickly, adding pops of the new color into the old to “visually ombre” the look so to speak. (Incidentally, this is also a tip I have for interior decorating, but that’s another blog topic altogether)

I so enjoyed creating this land art on a walk in the woods. The leaves were found on the trail, and will disintegrate or blow away, causing no damage to the forest for the sake of art.
Narrative. I actually have a notebook I carry around with me everywhere that is brimming with lists: lists for blog post ideas, general to-do lists, art ideas, and yes, Instagram post and self-portrait ideas. I’ve had on and off insomnia for the last four or five months, and there have been times I’ve grabbed my notebook in the middle of the night to write things like “cape made of cheesecloth from Dollar Tree sewn together, with fall leaves from my hike stuck in the holes” or “fern faerie queen with crown.”
When I go to the woods for self-portraits, I usually end up with enough I like to share over the course of 2-5 lines of my Instagram shares (so 2-5 days worth.) I never share all of the self-portraits in a row, but intersperse them with related images, such as a close-up of the foliage on the tree against which I’m leaning in the photo, a close up of the hat I’m wearing nestled among moss, or other beautiful items in nature I discovered on the same day as the self-portraits.) There’s often a story behind the characters I “play” in my images, whether I share it with my followers or leave it up to their imaginations.
Captions. Sometimes, when I have the time to invest, I’ve created short stories with the images, with a section of the story in each caption, stretching over 2-5 days. I love doing that sort of thing, and I love taking time to create original and poetic, whimsical and magical captions, but honestly sometimes I just don’t have the time, and I tap into my Word document I have on my flash drive that’s filled with favorite quotes sorted by subject (trees, nature, mushrooms, books, seasons, etc) Sometimes those saved quotes have actually been the inspiration for the themes of the self-portraits themselves.
Subject Matter. As I mentioned, I never share all of the self-portrait images in a row. Generally speaking, I arrange the order of my Instagram images (re: subject matter) as follows: two days (so 6 images) of nature, flat lay, or artwork photos (basically anything without my face in it, lol) followed by 2-5 days of self-portraits interspersed with related nature images. I find this gives my feed a nice balance between “hey look at my face” posts and shares for people who prefer my feed for my glimpses of faerie-related nature. The photos I share also generally follow this rhythm when it comes to symmetry of subject matter, where X is a portrait and o is a nature, flat lay, etc image:
X o X
o X o
X o X
o o o
o o o
Etc.
Planning. I also plan out about 1-2 weeks of my shares in advance. I know there are apps to do this for you, but I honestly have yet to find an app that is totally trustworthy when it comes to not losing your images in the transfer process, so I just work on my photos in Instagram, do the last minute touch-up edits, and then “back out” of the screen, and when it asks to save, I hit yes, saving about 1-2 weeks worth in the queue on the app itself. I also save the images I plan to share on my phone itself, because once in a blue moon, I’ll hit “share” and get the red bar of death, and I’ll have to quickly scramble to re-upload the images to Instagram. Because I have my shares all planned out, I also will screen cap the screen of “drafts” so that if anything happens, I have a record of what I planned to do and share.

I used PicsArt to create this image by combining three shots from the same day. This is also a fun example of various poses.
Editing. I use my iPhone 11 Max Pro’s in-phone editing tools for most of the tweaking of my images. I almost always darken the brightness, up the warmth, and add a dark vignette to the edges. Beyond that, if further editing is needed, I use the PicsArt app, which I highly recommend. Although I absolutely love and adore Instagram profiles like @thefoxandtheivy who use a sort of moody earth tone tint to all of their images to create a gorgeous consistency of tone, when I try to do it, I get sad that I lose the brightness of the original colors, so I tend not to use any filters on my feed at all.

For this photo I took a piece of my hair and rested it on a branch, then later added the fairy from an Arthur Rackham illustration in PicsArt. I was going for a sort of a “Cottingley fairies” cardboard cut-out look, so the “fakeness” was intentional, but I wanted the lifted hair to still make you question it.
Self-portrait wardrobe. I honestly just don’t have much (or any really) of a budget to buy new costume-type garments for my photos on Instagram, but I also want to have a whimsical and magical feel to my feed, so I often have to get quite creative. I find that it helps to layer long skirts, buy or make inexpensive new flower crowns utilizing my garden, Amazon, and silk flowers from Dollar Tree. Utilize giant drapey scarves for capes, cloaks, and hoods, and buy a few basic costume pieces like a medieval chemise with bell sleeves, a lovely girdle belt, etc. that you can then layer other pieces over and under.
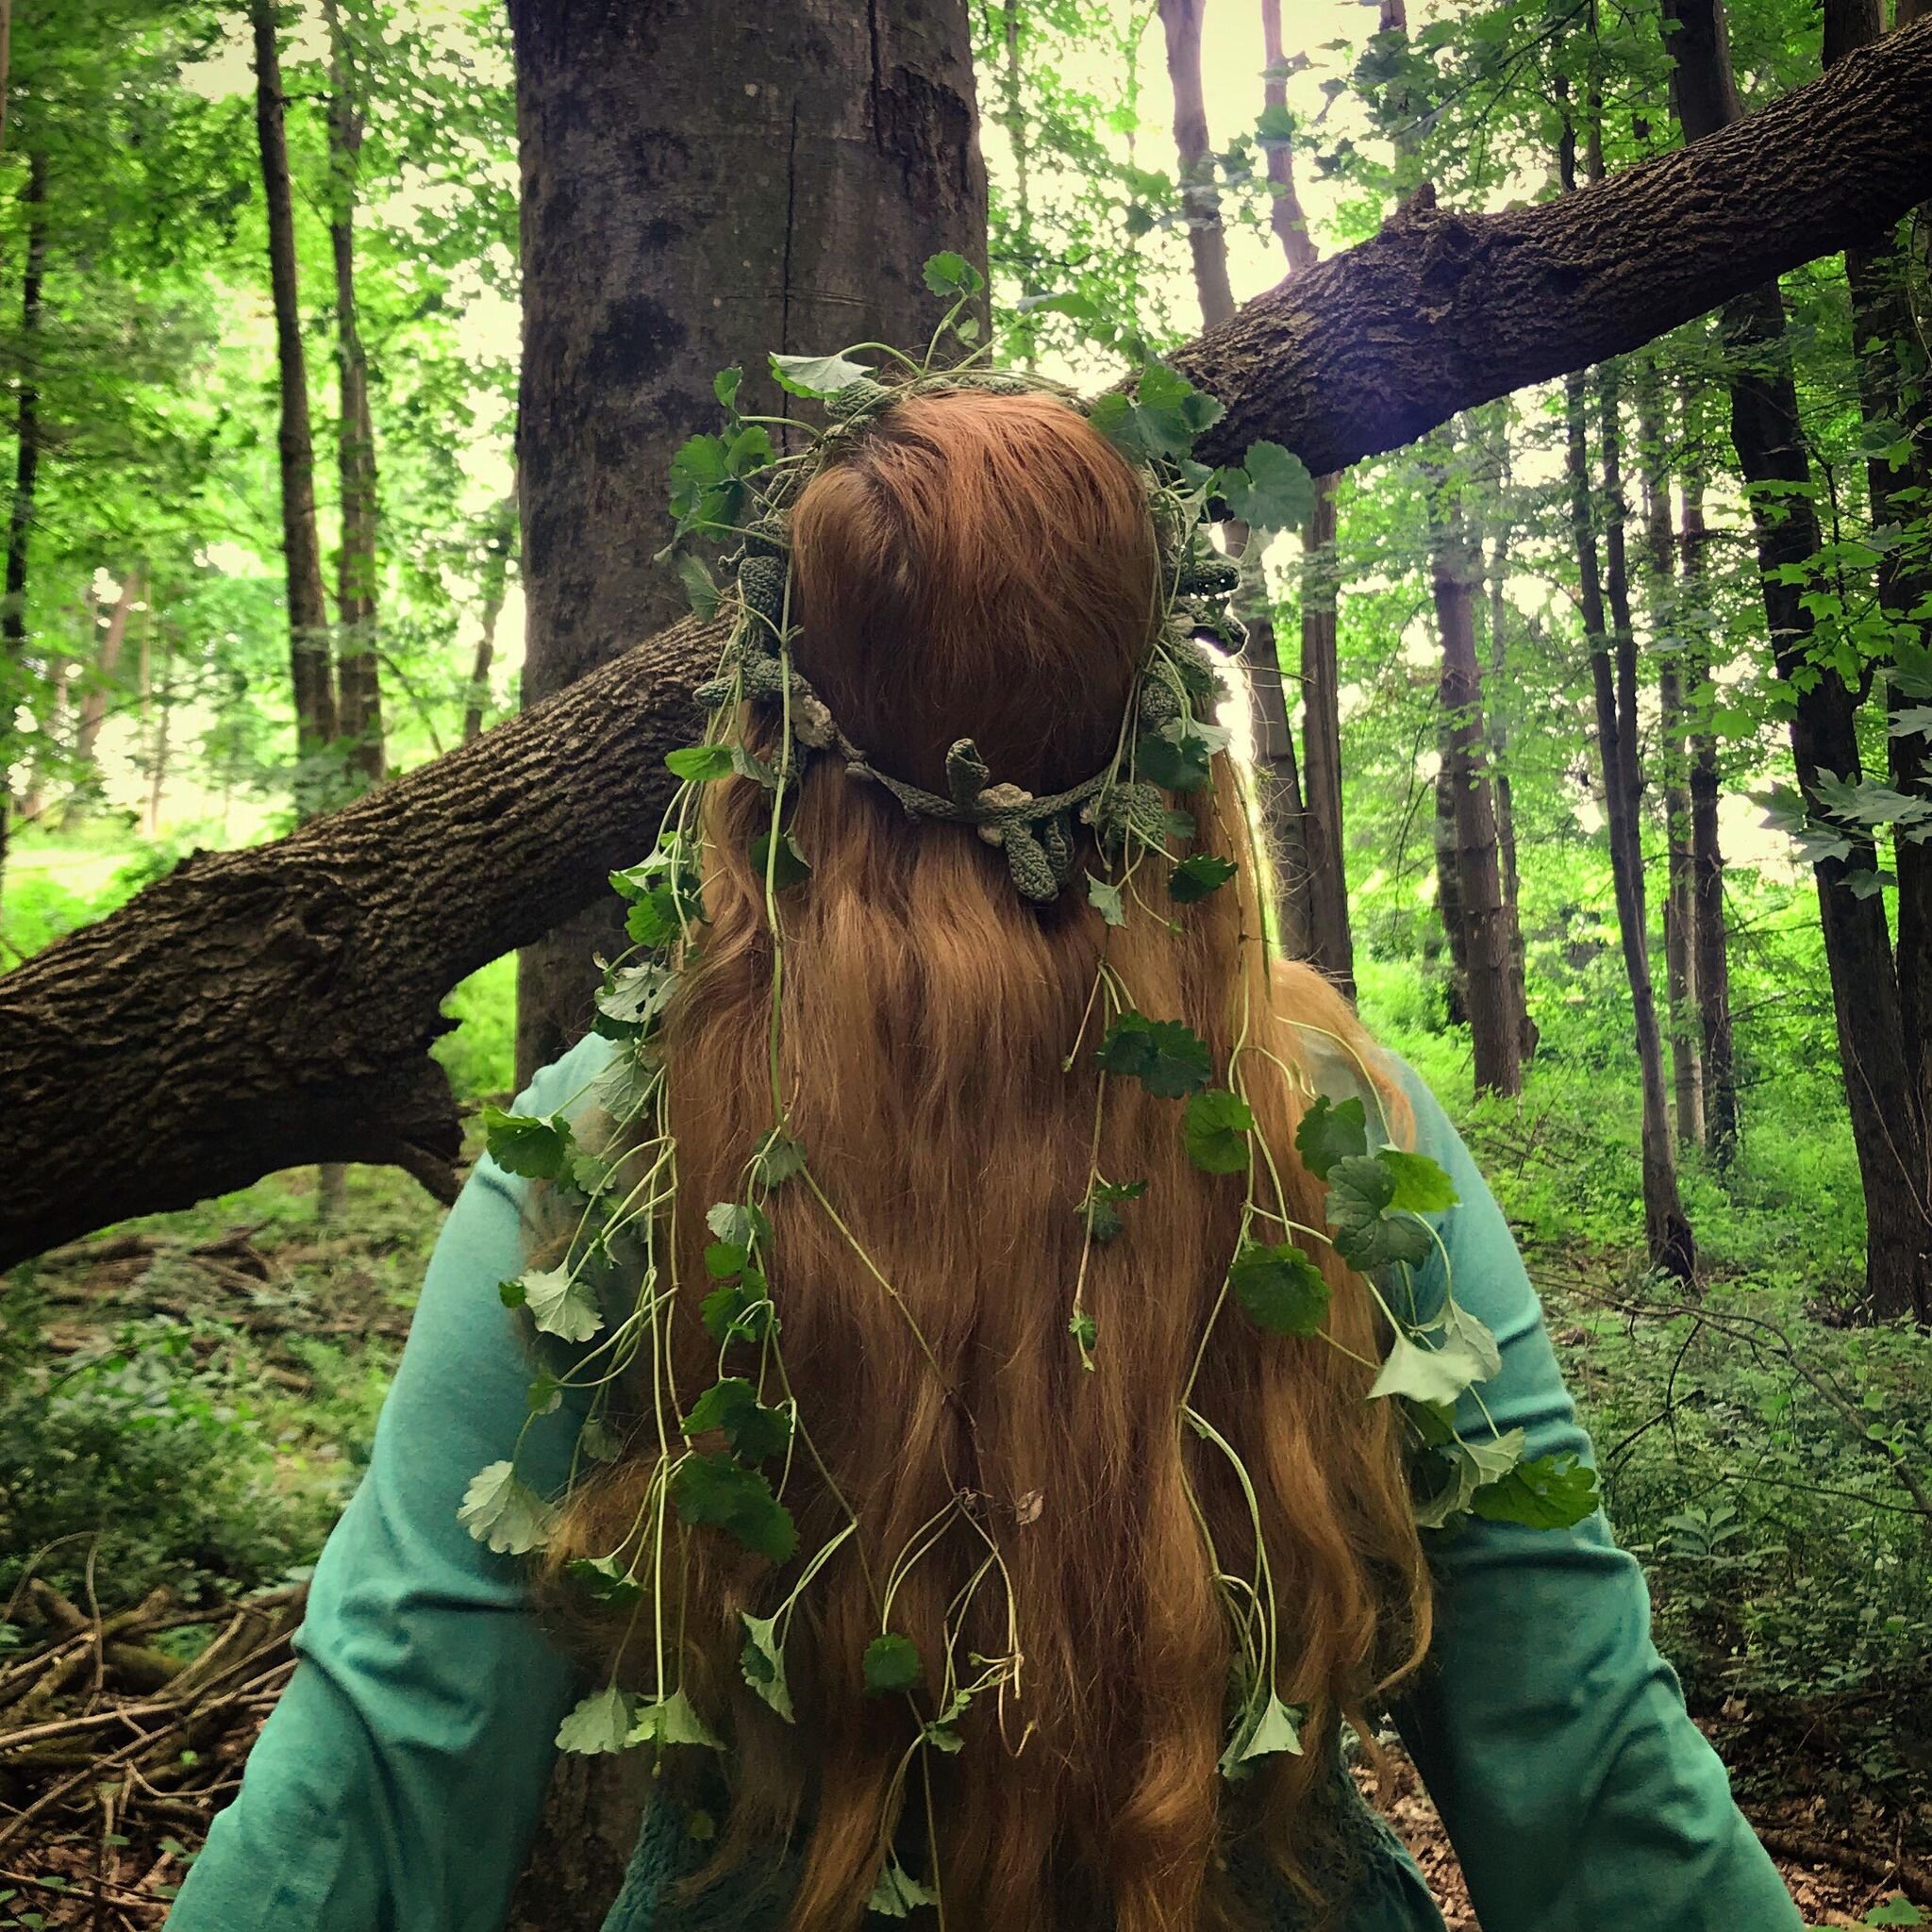
I carried a vine from my yard at home to the woods, and tied it around a simple flower crown in my hair for this shot.
Honestly as long as you can carry it with you to the woods, get it to stay on your body long enough to take some photos, and then be done with it, you don’t need to make your costumes to last forever if you’re photographing for Instagram. I learned this a while ago when I started working with photographers. Tape that drapey fabric in the back to make it look like a dress. Wear that gown that hasn’t fit you in years with the back completely unzipped, then only take photos from the front. If the skirt gets a hole in it, use it for a forest witch look where she just doesn’t care, or use that handy clone tool in PicsArt and fix it in post. Just think like you did when you were playing dress up like a kid.
Self-portrait tools. When I go to the woods to take self-portraits, I carry all of my props and costume pieces with me, a bag with my phone (my camera), phone zoom lens, and jar of dried flower offerings to the forest, and my trusty tripod and remote in a separate bag. This is the tripod I use, which comes with a remote that works up to about 20 feet (it says it works further, but I haven’t found it to be true). I used to use a flexible armed tripod that I’d have to attach to a tree limb, and now that I have an actual extending tripod, it has really opened up how many places I can take my portraits. Because the tripod extends in sections, I can easily correct for even the most uneven of ground. It’s a don’t-hesitate investment at the price if you plan to try your hand at self-portraits.

An example of using angles and separation in a pose for a photo.
Posing tips. I first started really making a hobby of modeling for fine-art photographers about ten years ago, so I’ve been at this a while. If your desired “style” of photograph is the same as mine, I would recommend first going to the classics. Pour through images of Pre-Raphaelite art, Golden Age fairy tale illustrations, and autochrome photographs on Pinterest. Pay attention to any commonalities of pose, angles, mood, etc. When you’re on location, remember that you can delete hundreds of images you might not like (and yes, I do. For every themed shoot I do, I literally delete hundreds of photos. It’s just me and the phone camera. I can keep tweaking and refining my pose until I’m satisfied or I’ve had enough.)
As you’re sitting on that stump, turn your face one way, the other way, look left, look right, close your eyes…try everything. Peek at the images you got, decide which angle you like best, and refine it from there. On a rare occasion, sometimes the image you want to create will involve facing off directly at the camera, full face showing, knees directly facing the lens. But it’s very rare. Generally speaking, you want to create separation between everything…separation between your arms and your torso, between your legs. Lots and lots of angles. Pay attention to the shapes your hands are forming (this can be tough when you’re also trying to hide the remote from view), to the angle of your feet and if they are gracefully pointed. Angle your waist away from the lens to create a thinner profile if you wish it. Stretch your back, stretch your neck. When I first started modeling, I went through a phase of being very into pin-up style photography, and I quickly learned when I was posing for that sort of photo that the most beautiful, carefree of images feel completely ridiculous and unnatural when you are actually posing. As you walk, you might have to sway way more than you normally do to create a sense of movement in the photos. When you sit, you may have to arch your back until it hurts. Anyone who says modeling is easy has never tried doing it. I’ve been sore for days after taking photos. But when you look at the phone screen and love the result, it’s worth it.
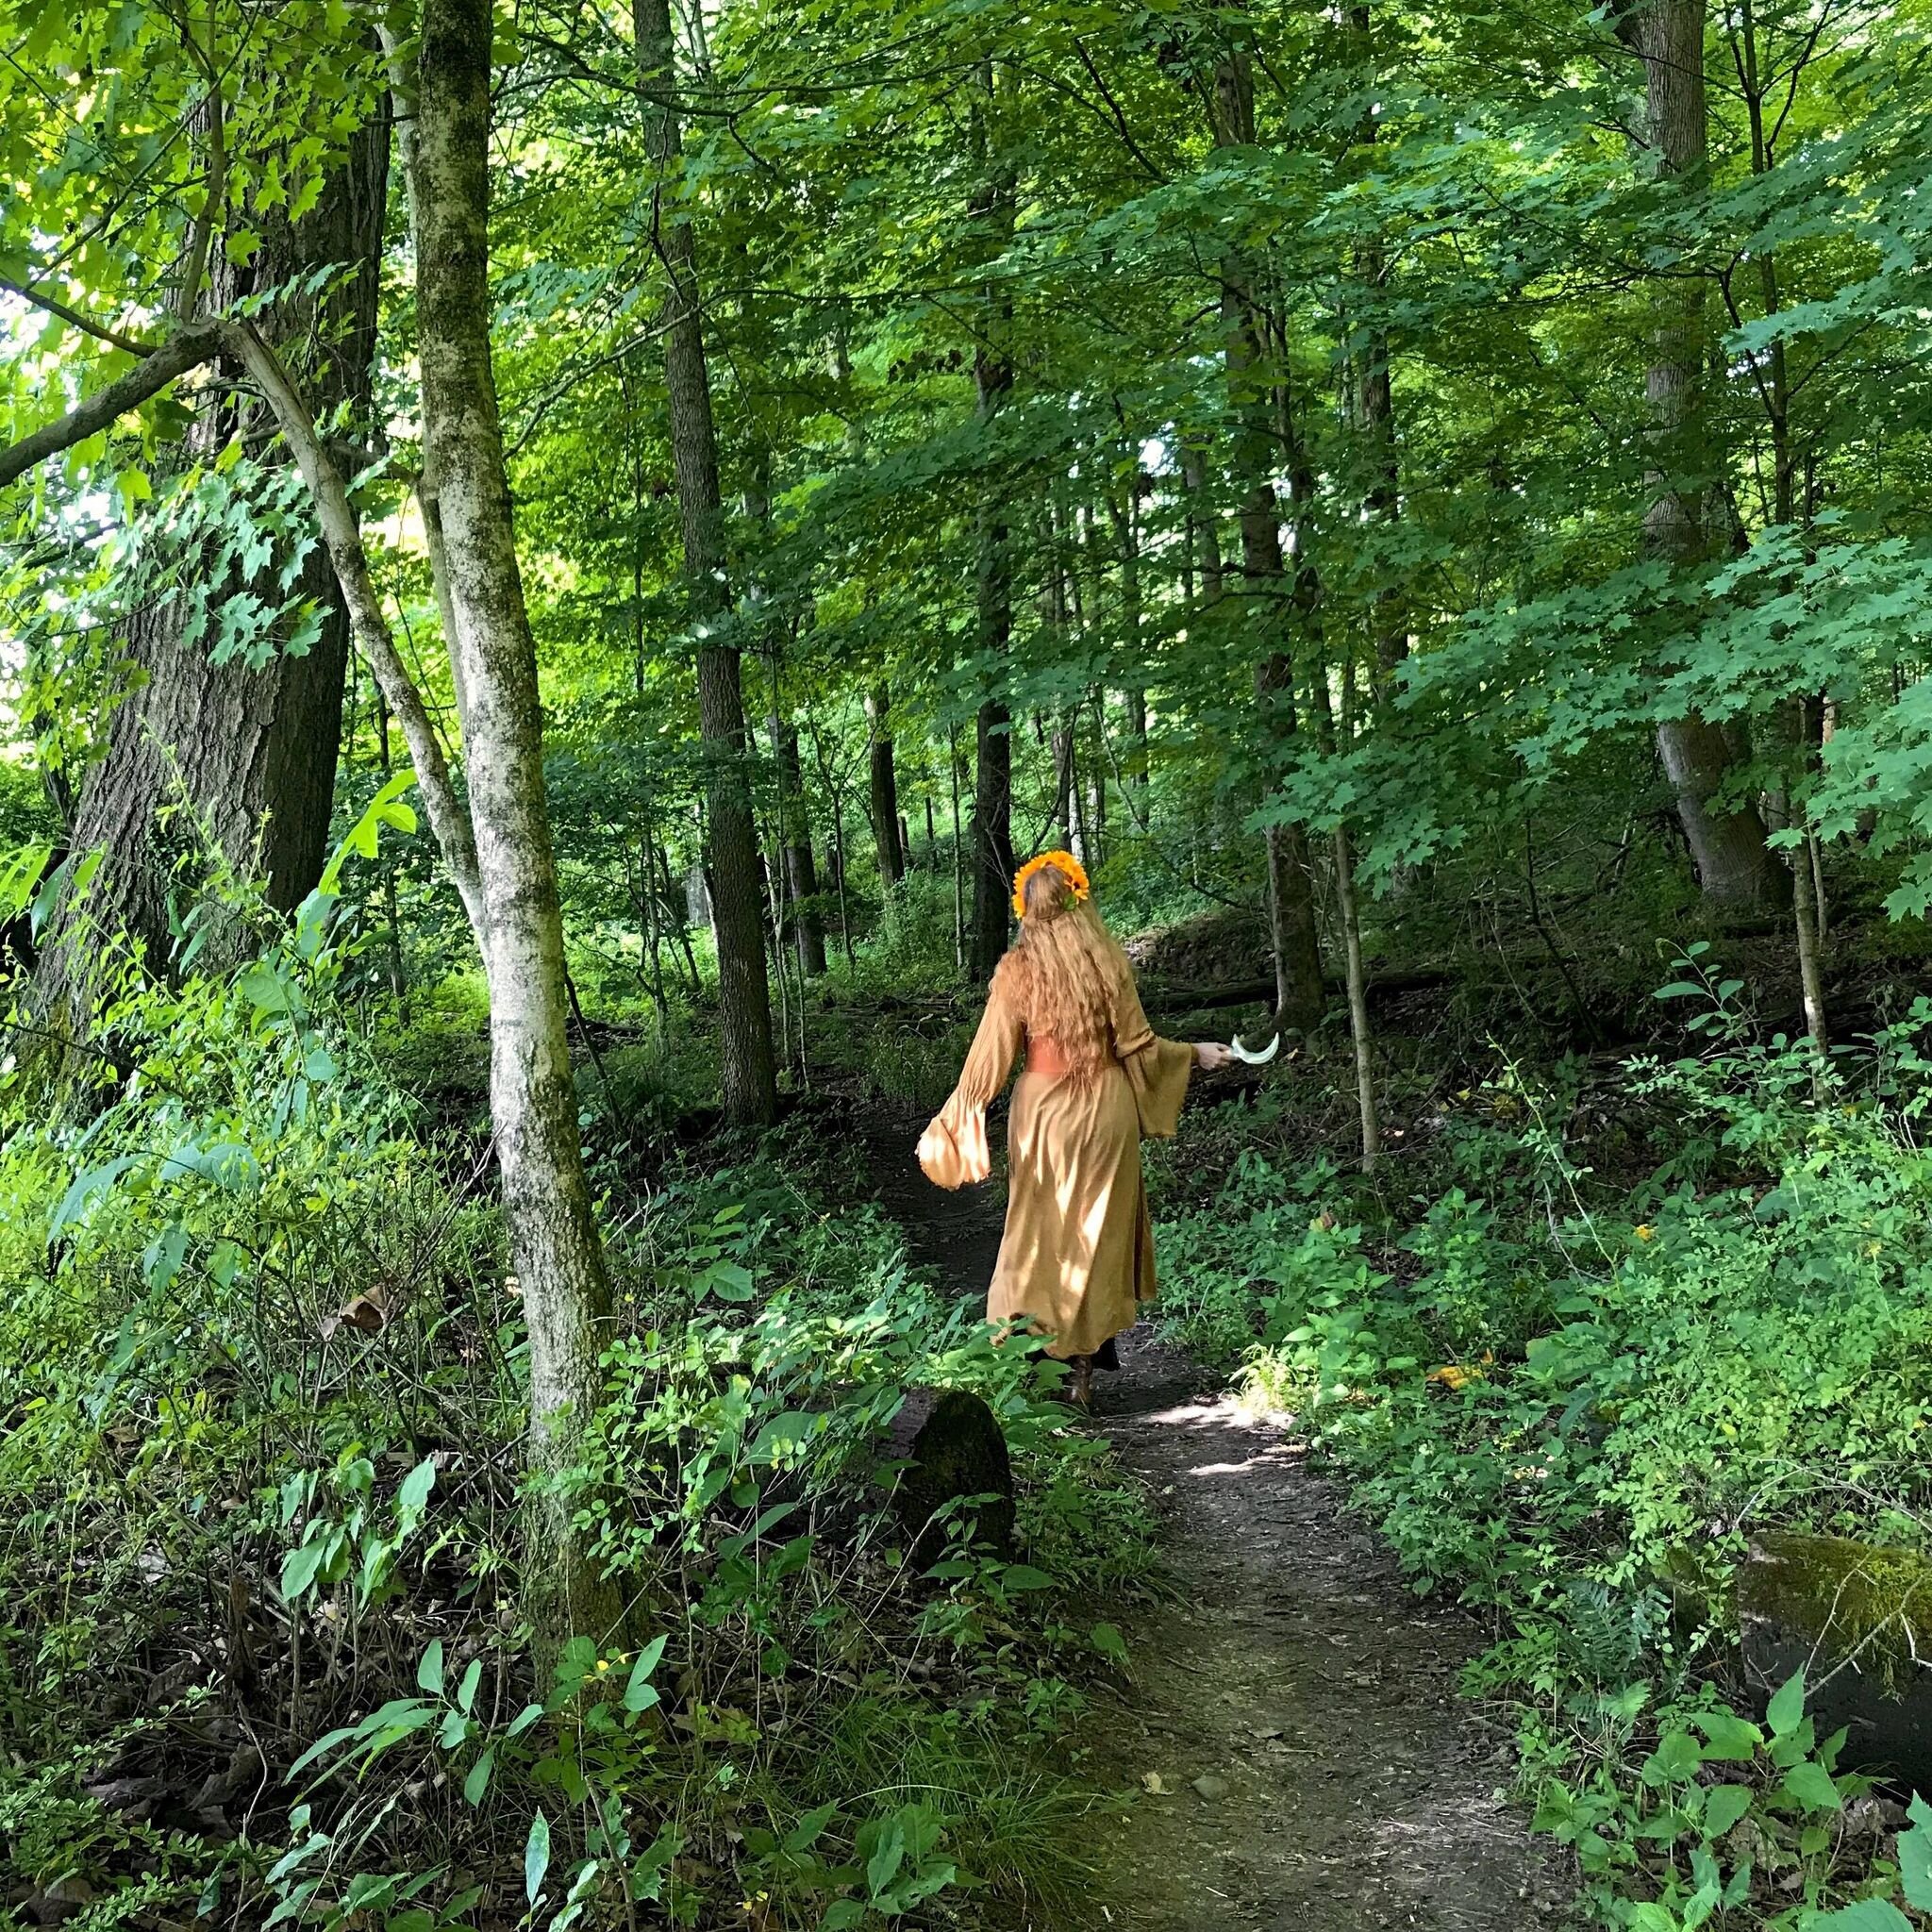
When I took this “walk away” shot I had to swing my hips in a silly way to get some movement in my skirt, and interesting angles.
Well. I think that about does it for the Instagram tips and behind-the-scenes. I know, it seems a bit excessive, perhaps a bit obsessive. But I honestly think of my Instagram as an art form, and as such I take pride in it, even in little things that I suspect no one else has ever noticed (until you read this post and now see). Perhaps you never plan to curate your Instagram, perhaps you’ve always wanted to but weren’t sure where to start. Just start with what you love…make it an extension of who you are, and you won’t go wrong. This is my version of what brings me joy on Instagram. Yours could be completely different. I can’t wait to see.